Yum
Print Friendly and PDF

Thursday, September 19, 2013

Talk Like a Pirate!

September 19, 2013 0 Comments

I always enjoy celebrating this fun day!  Today, we celebrated with the stories How I became a Pirate by David Shannon and Pirate Pete's Talk Like a Pirate by Kim Kennedy.    Both books were really cute and both the boys enjoyed them. 

We learned some fun pirate lingo.

Aaaarrrrgggghhhh! - sound of unhappiness
Ahoy, Matey! -  Hello, my friend!
Ahoy, me Hearties! - Hello, my friends!
Blimey! - exhortation of surprise
Blow me down! - expression of shock
Booty - treasure
Heave Ho - use some muscle & push it
Lad, lass or lassie - a younger person
Me - my
Savvy - do you understand/agree?
Ye - you

We made pirate hats, eye patches, spy glasses, and captain hook hand pieces out of construction paper, plastic cups, towel rolls, and aluminum foil.


Talk like a Pirate, Fun Days, Making Homeschool Fun, #Homeschool
Then, we made pirate boats with a free printable from Crayola out of card stock.

Talk like a Pirate, Fun Days, Making Homeschool Fun, #Homeschool


The boys created their own treasure maps from paper bags.  This is a great way to practice directions, such as right, left, north, south, east, and west.  We like to remember it as, never eat soggy waffles.   A few years ago we learned this fun saying and have never forgotten it. It works!

We used a free printable pirate board game from ESL Games Plus to practice our math facts.  Poppy cat practiced counting by counting steps while walking the plank.  I used masking tape on the floor as the plank.

I created a sensory bin for Poppy Cat with rice dyed black, coins, beads, and some rocks.  He had a great time playing and by the time he was through he looked like a true pirate.  If you have made the colored rice before, you will find that your hands get powdery from the rice.  Since our rice was dyed black he got powdery black hands and face.  Adorable!


Poppy Cat completed several worksheets, puzzles, and clothes pin math activities using the pirate printables over at 2 Teaching Mommies.  Check them out, they are awesome printables and free!

Finally, we made paper swords out of newspaper.  Check out Alpha Mom for these instructions.  This one is super fun and a great way to make something out of nothing.  I love it!


I look forward to celebrating this day again next year.  It was so much fun and a great way to learn.

Enjoy!

Bridget


Saturday, July 13, 2013

DIY Crayon Organization

July 13, 2013 112 Comments
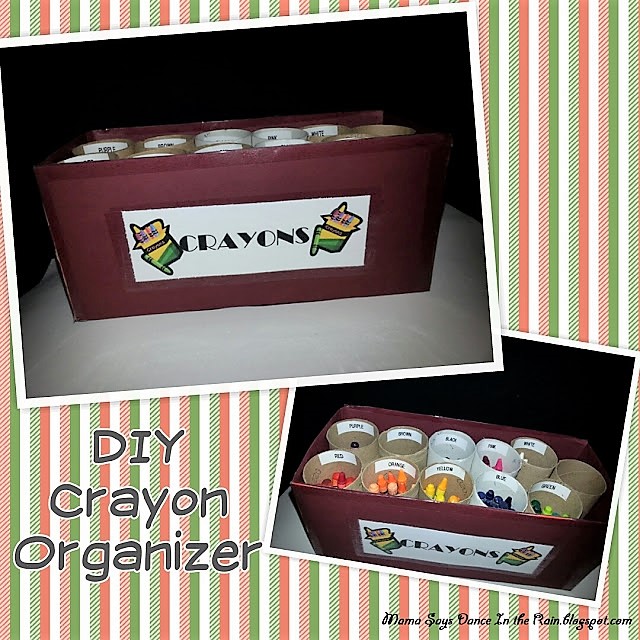
DIY Crayon Organizer

A little organization goes a long way.  Little Poppy Cat is always looking for a green crayon, his favorite color.  I found a fun solution browsing Pinterest, so I gave it a try.  The results were awesome.  Poppy Cat could not wait to organize all the crayons into the spots.  I labeled them with my P-touch label machine.  He doesn't read yet.  I hope it will motivate him to learn the color names while he sorts his crayons.

The original idea came from Aunt Peaches, be sure to check out her original post.  I modified the idea a little.  Here is what I did.  I used the box that trash bags come in along with the toilet paper rolls.  First I covered my box with card stock and added a printed a paper label from my computer.  Then I glued the bottoms of the toilet paper rolls to keep them stationary, since I have a little one.  Finally, I added labels with the name of each color with my P-touch label maker. 

It was a simple, fun project and it makes my day a little easier.

Enjoy!
Bridget


Thursday, May 30, 2013

A Sweet Way to Say Thank You

May 30, 2013 0 Comments
As our children grow there are people that touch their lives in lots of ways.  I have always felt strongly about making sure that my children show their gratitude to those that help them.  It doesn't have to be an expensive gift, sometimes a genuine thank you is enough.   I love to have my kids make cards.  I have found that the recipients love to receive them too. 


Today, I am sharing a idea I found on Pinterest.  The idea originated from The Happy Scraps.  I have added my little touches to make it my own expression.  It's a sweet little way to say thank you.

Here is what I used:

Small clay pot
Yellow paper shred
#2 pencils
Card Stock
Foam brick
Two sided foam tape
Pretty ribbon
Glue dots
Green craft stick
Flower template from Best Paper Flowers
Thank you tag from Dimple Prints
Single hole punch

I used double side tape to attach the foam block to the inside of my pot.  Filled it with yellow paper shred.   Then used the template from Best Paper Flowers and cut them out of different colors of card stock.  After I cut them out, I used the hole punch to put a hole in the center of the flower.  I twisted the pencil back in forth until it went through the hole.  Then inserted them into the foam in the clay pot.  I printed off my thank you card from Dimple Prints.  Then attached it with a glue dot to a green craft stick and inserted it into the foam.  For a extra touch I attached a ribbon around the rim with glue dots.  It was a simple project and a great way to teach my kids to show gratitude.

Have fun making this one!  Thank you to The Happy Scraps, Dimple Prints, and Best Paper Flowers for sharing your talents with others.

Blessings,
Bridget

Tuesday, May 28, 2013

DIY Multiplication Cubes: A Fun Way to Practice Math

May 28, 2013 1 Comments
DIY Multiplication Cubes - Making Learning Fun

I am always looking for a fun way to practice math.  There are days that I feel like Legoman cannot sit through another round of multiplication flashcards.  I came up with this idea to practice his multiplication tables.  Legoman loves throwing around the large dice and at times forgets he his really practicing his multiplication facts.

Here is what you will need. 

Two empty cube tissue boxes
Wrapping paper or any paper of your choice
Printed numbers
Clear shelf paper (available at the Dollar Tree)
Tape
Glue stick
Scissors

Here is how you assemble.

Wrap the box in wrapping paper and secure with tape.  Use your glue stick to attach numbers to the sides of cubes.  Wrap the boxes with the shelving paper.  The shelving paper helps keep the boxes nice as they can easily get torn from rolling them.

Let your child roll them.  Have them multiply the two numbers rolled.  This can also be used to practice addition or subtraction.  I use the same dice for Poppy Cat to practice number recognition.

Have fun, learning should be fun!

Blessings,
Bridget


Thursday, May 23, 2013

Milk Top Ladybug Counters

May 23, 2013 0 Comments
Ladybug DIY Math Counters
Ladybug Counters
One of my favorite things to do is, to make things from recycled materials.  Over the past couple of weeks, we have been studying bugs.  I decided to make use of some milk tops to make these cute ladybug counters.  They are super easy and a cute way to practice counting.

Here is what I did.  I used 10 red milk tops, glued eyes on top, and used a black paint pen (a sharpie works well too) to make the face and dots.  I made my ladybugs with one to ten dots on them.

I then made a page with numbers from one to ten for the ladybugs counters to be matched up with. I could not resist making a container to hold my counters in.  I love those parmesan cheese containers!  They make great recyclable games and storage.  I did the same thing to the top of my cheese container to make it look like a ladybug.  I covered the sides with green cardstock to make it look like grass. 

Poppy Cat enjoyed counting the dots on the ladybugs and matching them up with the right number.

Happy homeschooling!

Bridget

Ladybug Math Counters


Friday, May 3, 2013

"What is Cooking?" Dinner Organization

May 03, 2013 0 Comments
What's Cookin Menu Wipe Board

What's Cookin' Menu Planner

In an effort to be more organized, I came up with this handy wipe off menu plan. 

Each week, I write what I plan to cook by the appropriate day and make a note to myself where to find the recipe.

Here is how you make this handy menu planner.

Supplies:
Dollar Store clear magnetic frame 4x6
Scrapbook Paper
My What's Cookin' print out
Dry Erase Marker

Instructions:
Cut the scrapbook paper to the size of your frame.  Then print out the What's Cookin' printout (this should be cut a little smaller than the scrapbook paper).  Glue this to the scrapbook paper and insert in the frame.  Hang on the refrigerator and your on your way to a more organized week.

Be Blessed!
Bridget