Yum
Print Friendly and PDF

Friday, June 2, 2017

Fluffy Dairy Free Biscuit Recipe

June 02, 2017 0 Comments

A few months back I was diagnosed with a few food sensitivities, with dairy, egg, and corn being the main ones. I started looking for recipes to make; I found vegan, paleo, whole 30, and several more. None of these fit what I was looking for.  I started experimenting and the result is this healthy, fluffy biscuit that my family and I love. I am delighted to share this recipe with you!


Fluffy Biscuit Recipe (Makes 5 Biscuits)

Ingredients:
1 cup organic whole wheat flour
1 cup organic all purpose flour
2 teaspoons gmo free cream of tartar (I use Frontier Brand)
1 teaspoon baking soda
1/2 teaspoon sea salt
4 tablespoon organic coconut oil cubes (see note below)
1 cup full fat organic coconut milk (see note below)

Instructions:

Add 4 tablespoons coconut oil to a ice cube tray (I freeze one tablespoon per cube). I like these ice trays because they are easy to pop the coconut cubes out.  I let the coconut oil just get set not rock hard and then I pull them out of the freezer. I can smash them into little pieces from the underside of the tray. If they freeze completely you will have to let them set out for a few minutes while you are measuring your ingredients and then use a pastry blender to cut them up.

Preheat oven to 450 degrees. Line baking sheet with parchment paper.

In a mixing bowl combine the following ingredients: whole wheat flour, all purpose flour, cream of tartar, baking soda, and sea salt.

Once combined, add your coconut oil cubes to the bowl. Use a pastry blender to cut the coconut oil cubes into pea size pieces.

Add the coconut milk to the bowl and stir till combined.

Place a piece of parchment paper on a flat surface to cut your biscuits on. This makes clean up so much easier.

Pull dough from the bowl with your hands, if it is too sticky lightly dust it with a little more of either type of flour.

Then pat out dough on the parchment paper till it is a inch thick. Cut with a biscuit cutter. Do this until you have 5 biscuits.

Place all biscuits in baking sheet and cook for 10-12 minutes till golden brown.


Coconut milk:  I use a 15 ounce can of full fat coconut milk mixed with 2 cans of filtered water in a glass pitcher. Then I use an immersion blender to mix it all up.

Let me know how it turns out for you, I love comments they make my day.

Thursday, June 1, 2017

Welcome Back to Mama Says Dance in the Rain!

June 01, 2017 0 Comments
Welcome to Mama Says Dance in the Rain!  You may be wondering what the significance is in the name Mama Says Dance in the Rain. I'll start by sharing my story. We all experience moments in our day when things just don't go as planned. Well, as a result of several of those moments, trials, and questioning why is this happening; my sweet Jesus is teaching me. I have come to realize that those moments refine who I am, they develop character, and grow my faith.  Jesus is teaching me to be content. The Bible says in Philippians 4:11, "I have learned in whatsoever state I am in therewith to be content." God wants us to be undisturbed by what is going on around us until he brings change. Therefore, I choose to Dance in the Rain! I hope you will join me on this journey and I hope we will grow in sharing what makes our lives great!

Blessings!

Saturday, February 14, 2015

Loving Your Childhood Through Your Children

February 14, 2015 0 Comments
Happy Valentine's Day!  As a child I loved Valentine's Day.  I loved creating a box to store all my valentine's in and treasured the surprises that collected in there.

As I raise my own children that excitement gets reunited in constructing valentine boxes with them.  I love that they are unique and very much know exactly how they want things.  So, today I thought I would share their valentine boxes with you.  My little one loves cats, so the Poppy Cat theme lives on. My oldest is all about technology, so a robot with moving arms was created.  Be inspired to let them dream big and have fun!

I hope your Valentine's Day if full of memory making moments to treasure!
Bridget
DIY Valentine's Boxes, Cat & Robot Boxes
Valentine Boxes

Thursday, September 19, 2013

Talk Like a Pirate!

September 19, 2013 0 Comments

I always enjoy celebrating this fun day!  Today, we celebrated with the stories How I became a Pirate by David Shannon and Pirate Pete's Talk Like a Pirate by Kim Kennedy.    Both books were really cute and both the boys enjoyed them. 

We learned some fun pirate lingo.

Aaaarrrrgggghhhh! - sound of unhappiness
Ahoy, Matey! -  Hello, my friend!
Ahoy, me Hearties! - Hello, my friends!
Blimey! - exhortation of surprise
Blow me down! - expression of shock
Booty - treasure
Heave Ho - use some muscle & push it
Lad, lass or lassie - a younger person
Me - my
Savvy - do you understand/agree?
Ye - you

We made pirate hats, eye patches, spy glasses, and captain hook hand pieces out of construction paper, plastic cups, towel rolls, and aluminum foil.


Talk like a Pirate, Fun Days, Making Homeschool Fun, #Homeschool
Then, we made pirate boats with a free printable from Crayola out of card stock.

Talk like a Pirate, Fun Days, Making Homeschool Fun, #Homeschool


The boys created their own treasure maps from paper bags.  This is a great way to practice directions, such as right, left, north, south, east, and west.  We like to remember it as, never eat soggy waffles.   A few years ago we learned this fun saying and have never forgotten it. It works!

We used a free printable pirate board game from ESL Games Plus to practice our math facts.  Poppy cat practiced counting by counting steps while walking the plank.  I used masking tape on the floor as the plank.

I created a sensory bin for Poppy Cat with rice dyed black, coins, beads, and some rocks.  He had a great time playing and by the time he was through he looked like a true pirate.  If you have made the colored rice before, you will find that your hands get powdery from the rice.  Since our rice was dyed black he got powdery black hands and face.  Adorable!


Poppy Cat completed several worksheets, puzzles, and clothes pin math activities using the pirate printables over at 2 Teaching Mommies.  Check them out, they are awesome printables and free!

Finally, we made paper swords out of newspaper.  Check out Alpha Mom for these instructions.  This one is super fun and a great way to make something out of nothing.  I love it!


I look forward to celebrating this day again next year.  It was so much fun and a great way to learn.

Enjoy!

Bridget


Saturday, July 13, 2013

DIY Crayon Organization

July 13, 2013 112 Comments
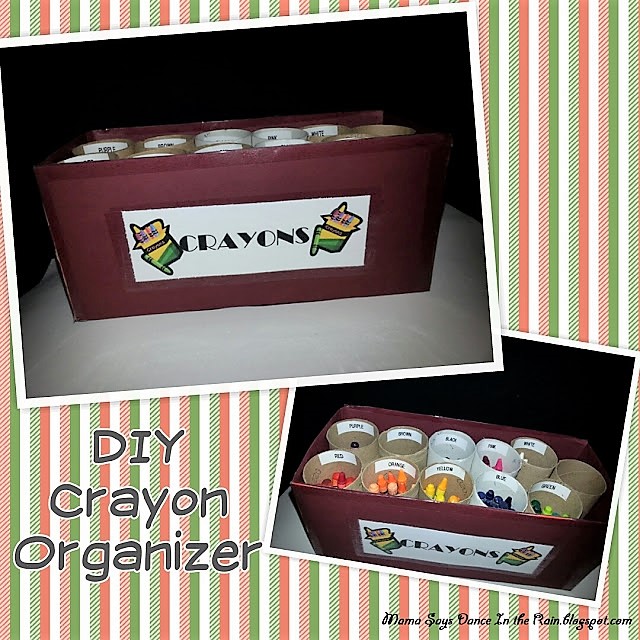
DIY Crayon Organizer

A little organization goes a long way.  Little Poppy Cat is always looking for a green crayon, his favorite color.  I found a fun solution browsing Pinterest, so I gave it a try.  The results were awesome.  Poppy Cat could not wait to organize all the crayons into the spots.  I labeled them with my P-touch label machine.  He doesn't read yet.  I hope it will motivate him to learn the color names while he sorts his crayons.

The original idea came from Aunt Peaches, be sure to check out her original post.  I modified the idea a little.  Here is what I did.  I used the box that trash bags come in along with the toilet paper rolls.  First I covered my box with card stock and added a printed a paper label from my computer.  Then I glued the bottoms of the toilet paper rolls to keep them stationary, since I have a little one.  Finally, I added labels with the name of each color with my P-touch label maker. 

It was a simple, fun project and it makes my day a little easier.

Enjoy!
Bridget


Thursday, May 30, 2013

A Sweet Way to Say Thank You

May 30, 2013 0 Comments
As our children grow there are people that touch their lives in lots of ways.  I have always felt strongly about making sure that my children show their gratitude to those that help them.  It doesn't have to be an expensive gift, sometimes a genuine thank you is enough.   I love to have my kids make cards.  I have found that the recipients love to receive them too. 


Today, I am sharing a idea I found on Pinterest.  The idea originated from The Happy Scraps.  I have added my little touches to make it my own expression.  It's a sweet little way to say thank you.

Here is what I used:

Small clay pot
Yellow paper shred
#2 pencils
Card Stock
Foam brick
Two sided foam tape
Pretty ribbon
Glue dots
Green craft stick
Flower template from Best Paper Flowers
Thank you tag from Dimple Prints
Single hole punch

I used double side tape to attach the foam block to the inside of my pot.  Filled it with yellow paper shred.   Then used the template from Best Paper Flowers and cut them out of different colors of card stock.  After I cut them out, I used the hole punch to put a hole in the center of the flower.  I twisted the pencil back in forth until it went through the hole.  Then inserted them into the foam in the clay pot.  I printed off my thank you card from Dimple Prints.  Then attached it with a glue dot to a green craft stick and inserted it into the foam.  For a extra touch I attached a ribbon around the rim with glue dots.  It was a simple project and a great way to teach my kids to show gratitude.

Have fun making this one!  Thank you to The Happy Scraps, Dimple Prints, and Best Paper Flowers for sharing your talents with others.

Blessings,
Bridget